12.29.2011

Nursery "Mobile" Hot Air Balloon

In keeping with our nursery theme "Welcome to the World" I wanted to make a hot air balloon mobile.  After lots of researching, imagination, and inspiration I decided to base my design off good ole Martha.  So, for step by step instructions click on the link below:

I will say I decorated mine different and of course made a different basket at the bottom!
I will let you take a look at the pictures of the process!

Paper Macheing the balloon
(this was on Thanksgiving Day and setting up Christmas..understand the background please!)

For my third layer I used triangular cut pieces of vintage postcard scrapbook paper

My dad has this beautiful collection (from his childhood) of stamps.....I used these for decor on the balloon!
I am one lucky woman! I loved just looking at these relics :)

Balloon is twined and 'stamped'

....Hot Air Balloon is flying..

Handmade Basket
{see below for instructions}

...Hope Lukas loves looking at this while rocking in the chair...

Basket Directions:
Now, I have to give my husband credit for original idea and aide, without him who knows what this would look like...for real!
1. Cut out an open cube net and fold design side in (so it will show when looking into the basket)
2. Starting at the base center glue down twine in a circular pattern.
3. When you arrive at the square sides: glue down twine while wrapping around the basket until you reach the top.
4. On each side glue down the twine in an "X" pattern.
5.  Attach the basket to the balloon (using hot glue) from the hanging pieces of twine. (this might take 2 people in order to make it easier).
6. Tie all 4 pieces of twine in a knot beneath the basket

DONE!

We love this piece of the nursery and it was fun to create. 

{Kate}

Oregon Advent Tree

As I have mentioned my hubs is from OR!
This year the school fundraiser prize was keychain rubberDUCKS!
The University of Oregon, where my hubs attended for his undergrad degree, mascot is the DUCKS!
Geoff and I collect rubber ducks (as long as it has some sort of meaning...we do NOT just buy rubberducks for the fun of it).  We store them in the shower/tub so one day our children will have TONs of fun ducks to play with at bath time ;)
Anyway, I was so excited when I saw all the bazillion little rubber duck prizes and with the help of my fellow co-workers and some students I collected enough so that I could put together a FUN advent for my dear OR lover hubs!
..Here is the final tree.. 
He loves it....and so do I....and I KNOW it will be great fun for our little ones someday to assemble!

..Topper.. (OR 'DR.')
Handmade Tree Skirt
..Finished Tree..
upclose shot

again upclose so you can see the different ducks...ha!
..Merry Christmas..
Thanks to my fellow co-workers for your 'duck donations'...we heart our tree!

{Kate}

12.28.2011

Christmas Stockings {hung with care}

I've been wanting to make stockings for oh 5 years....
Last year at Targets after Christmas sale I saw these gorgeous white with ribbon ones...I knew I wanted to embellish them for our own! I, also, purchased the silver monogram letters then as well.

Supplies I had ready...Those are felted balls to the left

Stockings completed


Geoff's Stocking

My {kate} Stocking

To make these I used a fusible interfacing.  I drew (backwards) each design and then ironed it onto my felt.  Then I cut each piece out (mine was tedious...dear Santa) and with my mothers SMALL irons, I attached each piece to the stocking.  This was to not ruin the white pelt of the original stocking. 
To make the garland pieces, I used a special felted wool needle and strung my felted balls onto thread.
I adore them!
Now, Geoff's has a special meaning (in my opinion).  He was born and raised in the beautiful state of Oregon, which is known for its Douglas Fir Trees (which are gorgeous).  So, I decided it was appropriate to make his a douglas fir Christmas tree...and I love his (more than mine). 
..Merry Christmas..
p.s. I did purchase a silver letter "L" for our new addition next year at Target after Christmas sale ;)

{Kate}

Family Height Chart

I love the tradition of being meausured each year on your birthday (or other days really) and marking it down on the side of a wall/door/whatever!  So, I wanted to make a measuring device for our newest member arriving in March to start off right!  I, also, made one for my brother's family {Christmas Gift}  which looks very similar :)
I wanted to originally make a floor mat where we'd put all of our children's footprints, but that plan was foiled.  So, I decided to combine the height chart with footprints!

DETAILS:
I marked evey 1/2 in, 1 in, and feet.
I stained it with a wash (paint and water) I did a lighter color, let it dry and then a darker color.
I used a black sharpie for the markings and black paint and stencils for the #s
Ask me if you want details on how I did the quote :)


We plan on printing each childs footprint up the side as they arive home (we'll see how many we have...ha!)

This had to be custom created due to the light switch (as you can see).  I think it turned out with the best possible senario!
Love it! Now, if we ever move...lets hope the light switch height is standard...eekk!
-note to my bro- if you'd like a quote added to yours...let me know


Nursery Handpainted Mural {part 2}

ok...I wasn't totally pleased and had to still play with my mural :)
Yesterday, I finished it up and now I think I'll be done (we'll see...)
So, I dry brushed it with a darker brown to give it more of an antique look....hope you like it!

DONE! We've also hung a globe from the over head fan as you can see above!

Eastern Hemisphere

Western Hemisphere


12.12.2011

Nursery Handpainted Mural

WELCOME TO THE WORLD

This is our nursery theme for baby Luke.  I hope in the years to come he appreciates it and loves his room as much as we do!  So, we are doing a vintage world map idea and many projects are still in the works...for one, his mobile...I LOVE!!! It is almost done and I can't wait to show you all....can't wait!

Over Thanksgiving Break I finished the 1st part of the wall mural.  I'll show you the progress in pictures! I've not had a chance to 'beautify' these shots..so keep in mind colors might be a bit off due to flash/no flash/day/night/etc!
{ENJOY}

Before and Blank

Drew on the Map (it is with white chalk and kinda hard for you to see....it is there!!)
This is Sans-Crib Skirt as well...


Made a "paint option board"...My sweet husband primed/painted the green background color for me
How I did it.....I had my mother/puppy/husband/dad watching me (dad/hubby were in and out doing other jobs)

{South America}

Now, only part of the process is done here in this picture...Only Australia and Africa had been 'techniqued' at this point...still no border or final antiquing...

Final look {as of now} with flash...and you can see our FABULOUS crib!

No flash picture...This is taken from the doorway!
Now, like I said I've not antiqued/browned up the mural yet.  Trying to teach/grade/masters projects/Christmas prep....this has been put to the wayside (boo).  My plan is to complete it over Christmas Break! 
P.S. This was painted (almost all of it) on Thanksgiving Day while I was preping dinner for the family...multi-tasking at its finest! 
I can not wait to finish it and antique it up!
Also, as you can see in the pictures our curtains are like a burlap fabric.  If you look at the frame post, I backed each one with burlap.  Burlap=world travel fabric...right :)  So, many room elements will contain BURLAP.  My mother and I designed the crib skirt out of burlap.  In my momma's free time she created it and it matches the curtains perfectly! GRACIAS....you can see it in the last picture.  Still do not have sheets for the crib so ignore the matress (thanks Linda!)
Next up is our mobile....like I said before....LOVE IT.
Can you guess what the mobile may be now that you know the 'theme'!??!

{Kate}

11.27.2011

Nursery Wall Decor

Hope you all had a wonderful Thanksgiving full of love and thanks of course!
I created a HUGE and overwhelming list of things to do while on break.  I did NOT get them all done, however, am still trying my best!  I wanted to share with you today one wall of the nursery for our little one coming in March '12. 
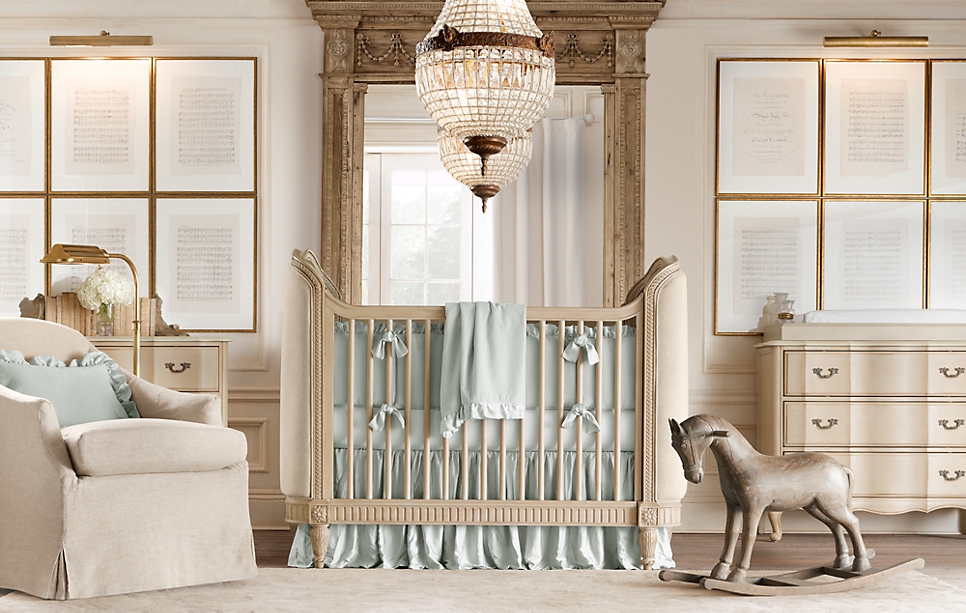
This was inspired by Restoration Hardware Baby & Child (I'm completely obsessed with their stuff):


Mind you our theme is COMPLETELY different from the picture seen above...but notice the lovely sheet music frames adorning the walls?!
I found an AMAZING deal on black frames and it took a while to measure and hang perfectly, but I adore the final look!  I made sure to purchase large enough frames because I want to be able to display many different things as they come our way {his artwork/baby announcements/pictures...etc}

I'm still drooling over the furniture...love it!  The candle is the unity candle from our wedding!  You can't see it very well, but the metal airlplane under the light was made by my grandpa MANY years ago.


..Top Row..

..Bottom Row..
 I will admit, I'm not 100% sure this wall is 'done', but as for now it will be! If you noticed in the top middle picture frame we've decided on the name Lukas Michael! His middle name is my father's 1st name and my middle name is Michelle...keeping it in the family!  I am thrilled he is a little boy to carry on our last name..whew (my husband is the only boy in his family so I made it a mission of mine to make sure we have at least one boy to carry it on!)

Hopefully I'll be able to show you the other walls soon...I'm working on a painted mural and this will tell you our final theme! It is ALMOST done...eekk!  I'm trying to squeeze every minute from every day...wish me luck!

{Kate}

11.02.2011

M.I.A

HOLY MOLY its been a while huh! Just wanted to pass along the news of where I've been.  I have about a bazillion crafts/art things I've been doing just haven't had a second to upload and tell you about them!  Hopefully, here soon something will be up :)  I've got some important news that most of you already know about...ha...

I'll switch to a better picture once I'm able!
Yup...I'm 20 weeks and 3 days pregnant! This summer I was spending most of my time with "John" and revisiting my delcious meals (in which I wasn't preparing--ha!).  Now, I feel great most of the time and working outish and dancing as if I was 'normal'. 
I'll post more stuff when I grab a chance...
p.s. I'm a full time teacher...started my masters....and pregnant  (wife/sister/friend....as well of course) so my time is FULL....
 
{Kate}

9.21.2011

Santa Fe Style Rice and Beans


I've been in love with Michelinas Santa Fe Style Rice and Beans (go HERE for their nutrition facts)frozen lunch for quite and while (and might I add VERY inexpensive..$.88) I dislike strongly eating frozen meals for many reasons.

1. I love to cook and I feel like I'm cheating
2. I don't like eating processed/not the absolute healthiest meals.

However, as a teacher/wife/mom to be/friend/co-worker/daughter/etc my time is not always as I want!  Well, I looked up Santa Fe Rice and Bean recipes and none of them seemed to match my Michelinas meal (at least ingredient wise). So.....I've made my own and HOLY YUMMMYYYYY!


Kate's Santa Fe Style Rice and Beans

2 cups cooked rice (use chicken broth) (I used min. rice)
1 (15 oz.) can red beans (rinsed and drained)
1 cup corn (I cheated with frozen)
2/3 cup green bell pepper
1/3 cup zucchini
1/2 of a jalapeno pepper
2 T green chilies
1 cup sour cream (reduced fat)
2 T milk
2 cups of mixed mozzarella cheese and cheddar cheese (save 1 cup for on top at end)
squirt vinegar
1 t minced garlic
2 T margarine
Spices:
1/2 tsp chili powder
1/2 tsp salt
1/2 tsp paprika
~~Mix beans, corn, 1 cup of cheese mix, rice in a large bowl
~~Melt margarine in saute pan and add garlic (saute!)
~~Add in all veggies
~~Mix milk, sour cream, vinegar, and spices.  Then add to saute pan.
~~Heat and stir, once mixed add to bean mixture, stir, and pour into 9x13 dish.
~~Put in oven, uncovered at 350 degrees for 30 min. for the last 10 min. add 1 cup of cheese mix on top!
Um...yum! Let me know if you tried it and how it tasted.  Hubby and I used tortilla chips to dip into it even! 

NOTE TO SELF: this is a work in progress since I created it from scratch...I think next time I'll double the amount of sour cream and milk b/c I want it a little more saucy...Hubs liked it just like this! Also, I want to ask my brother-in-law for a great Mexican chicken marinade to add some delicious chicken to this dish!

{Kate}

9.13.2011

DIY Wedding {ring bearer pillow}

As I mentioned in my veil and headpiece post I had a collection of my family wedding heirlooms!
My mother made my aunt's and her wedding dresses so we had leftover fabric from each.  I KNEW I had to use it somehow.  I ended up deciding to create my ring bearer pillow form from my mom's fabric, the silk outer pillow from my aunt's wedding dress fabric and a pearl necklace of my grandmas.  I, also, had received as a gift from my bridesmaid Lisa some green ribbon and I used it as my flowers. 
Simple to make, sentimental in value! I made a simple pillow out of the fabric, and hand sewed the pearl necklace on around the edge (the necklace was already tubular in shape).  After I handmade all the flowers and sewed each on to create my little masterpiece for my sweet ring bearer to carry!
..i love it..

after the ceremony
.. son of blogger: squeezing it all in ..

ha...I wear two rings! The diamond and the fat bright sterling silver rings are mine, my hubby's is the one on the bottom left...hammered was one of our 'themes'!
If you need/want more instruction or questions, let me know.  I'd be MORE than happy to help!
{Kate}

9.12.2011

DIY Wedding {Veil and headpiece}

I knew I wanted to use vintage items for my wedding....well, since I knew what a wedding was! My mother had saved a bunch of special family wedding items and when I got engaged we looked through the collection to see what could work for mine.  I ended up using a bunch of things, however, today I want to share with you all my veil and headpiece.  My grandmother had used as a veil a white, beaded headband thing with white (since yellowed) toole. 
.Walter and Kathryn Goodin.

.Walter and Kathryn Goodin.
I loved the white beaded piece and knew I had to attempt to make it work.  I hadn't picked a dress out yet, so it was important to take it with me!  My mother was heavily involved with the following process (well, really she did it all, I was WAY TOO NERVOUS with a family heirloom).  She and I called a bunch of different services/restoration specialists.  None of them wanted to
#1 do it themselves
#2 tell us how they'd attempt it due to liabilities
One sweet man (after my mom worked her convincing magic...amazing) on the phone finally explained his ideas on restoration and my mom went to work....bless her!
Pre-Cleaning

Pre-Cleaning...upclose...look at that beadwork!
Days, sweat, anxiety and multiple cleaning products later we had what we wanted.

My dear bridesmaid Lisa cut the veil fabric the day of the wedding (no sweat right).  I had ordered Russian netting over the Internet (hard to find here in Cincy).  Lisa cut it for me (I was too nervous) in a big rectangle.

what a great friend....as I laugh at her...
we wrapped this around my side bun and bobby pinned it down
..Tracy putting it all together..
I loved my veil and headpiece and wouldn't change my decision for the world! I meant so much to me to have something of my grandma {who past when I was in high school} ON me for our wedding and could feel her presence and love all day.


{Kate}